 |
| Sample Screenshots |
So let's talk about map generation.
First, very quickly, we've got to address art style. I've always wanted to find a way to make a game map look old book maps. I adored the maps in the Lord of the Rings as a kid, and grew up playing Bungie's Myth games which have a very similar style in their world map. Heck, I still occasionally peruse The Atlas of Middle Earth (which is next to my desk as I'm writing this) for fun. Very memorable art references. I knew before the jam theme was announced that I wanted to finally fit fantasy mapmaking into the project, which meant finding a way to produce the appearance of a parchment map.
The parchment look is produced by several layers of textures interpreted by a custom shader. Thankfully this is made easy using ShaderForge (a very handy Unity plugin). I've done manual shader coding in the past, before I discovered ShaderForge, but I'm much happier if the preset node options in ShaderForge do the job for me. At a basic level, there's a set background parchment texture, a masking edge texture, and some calculated color burn approaching the edges. The background and edge textures are made in Photoshop. Color and shading shifted several times over the course of the project for clarity without clash. Here's what a blank map looks like:
 |
| Basic Parchment |
Elevation and rainfall values are set by a simple nearest neighbor search in two master terrain-type arrays. While there's some noise to shake things up slightly (I made use of Unity's Mathf.PerlinNoise function to avoid totally random noise, though only extremes actually affect the Region hex-grid and they're never allowed to wipe out basic land), the overall shape of the continents is determined by the elevation master array. The rainfall master array is similar, but also dependent on the elevation array: each time a mountain point is added to the elevation array, wet and dry points are added to the moisture array to simulate rain shadow. Sadly, one feature I didn't have time to implement was rivers, but they'd be a combined product of elevation, rainfall, and a recursive flow function (very similar to my unfinished Dominions 4 map generator, from which many of this project's technical ideas originated).
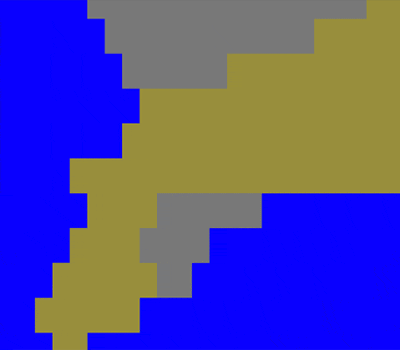 |
| Early Region Grids - Elevation Debug View |
One benefit of targeting a specific subset of maps - traditional fantasy maps - is that they're generally modeled off of Europe and thus have a relatively limited feature set. They are in the northern hemisphere, they feature seas to the west and south, and they rise to mountains in the north and sometimes east. The master elevation array is seeded to produce a similar result, and the rainfall array assumes that moisture comes in off the seas to the southwest. Also worth noting is that the a dry point is placed in the center of the inhabited kingdom (which isn't visible on the map texture, since cities are part of the partly-finished interface - NGUI sprites, to be exact). The reason is simple: we humans chop down trees like crazy wherever we settle. Tweaking the rainfall master array was the simplest way to simulate this venerable form of terraforming.
Translating a small grid of Regions into a large grid of pixels is where most of the work lies. Thankfully a hex-grid makes for a series of triangles, which makes it relatively easy to find the 3 closest Region points for each pixel. Here's an example, using the same simple closest-type algorithm as the Regions did:
 |
| Basic Elevation Texture |
 |
| Noised Elevation Texture |
 |
| Forests and Color Tweaks |
 |
| Borders! |
Starting to look familiar now, though tweaks on color, boldness, and shading distance never stop. It's not as obvious in this screenshot as in the final version, but the water fades towards a white (technically teal) border rather than a black one. It's a simple trick I picked up long ago, making texture maps for custom Myth II maps, but it makes water look much more crisp and real than the dark shading that I still sometimes see on drawn water.
You'll notice that the mountain areas are still flat textures in these screenshots. That doesn't fit the target style: we want "hand-drawn" looking hills and mountains. Instead of drawing the flat mountain color (and it's borders) on the texture, we need to composite a bunch of smaller sprites onto another texture to form the mountains. The system needs to sprinkle sprites onto mountain areas, with the type of sprite depending on the elevation of the target pixel. That means referring to pixel elevation again, along with a random check to see if a sprite should be placed. Jumping ahead a bit, it surprisingly looked best for sprite placement to be totally randomly determined (albeit restricted to within mountain regions), and instead for the sprite type to be set using the more complex Perlin-influenced individual pixel elevation (from among 3 different sprite categories of increasing size, which I called hills, mountains, and whitecaps).
Implementing this system isn't too hard, but it does require attention to a couple of simple steps. First, iterate through the pixel array by going from top to bottom (rather than the usual bottom to top). This means the sprites will appropriately layer them from background to foreground. Second, each sprite needs an additional mask: when placed, it needs to over-write any other mountain pixels in part of it's area (the interior of the mountain) - often with transparency! So it not only needs an alpha channel to determine the transparency of it's pixels, but an additional alpha channel to determine where it overwrites it's brethren. Finally, each sprite also needs an exclusion zone in which other sprites can't be placed (or else it sometimes looks too crowded). With those additional pieces of data in place, the system works quite smoothly - and if I spent additional time in Photoshop to make more sprites, it would be little trouble to integrate an arbitrary number of variations in hill/mountain/whitecap styles. I'm quite pleased with the existing sprite arrays though:
 |
| Hill and Mountain Sprites |
No comments:
Post a Comment